
Q-Learning의 기초적인 설명은 여기에서 확인할 수 있습니다.
Q-learning에 대해서 배워봤으니, 이제 눈과 코드로 어떻게 된건지 볼 차례입니다. 예제부터 쭉 한번 작성해봅시다.
먼저 Q-learning으로 저는 maze를 탈출하는 방법을 가르쳐볼겁니다.
일단 먼저 시각화를 하기 위해서 pygame으로 틀을 짜볼까요??
class Grid:

    def __init__(self, x: int, y: int, grid_type: str = "basic",
                 text: str = "", color: tuple = (255, 255, 255)):
        self.x = x
        self.y = y
        self.grid_type = grid_type
        self.text = text
        self.color = color

        return


    def __str__(self):
        return f"현재 위치 ({self.x}, {self.y}) [{self.color}]"
하나의 격자 블럭을 이렇게 정의해봅시다.
이거를 Block처럼 하나씩 쌓아서 Board라는 클래스로 미로를 한번 만들어봅시다. 위에서 설명한 Q-learning처럼 너무 큰 상태 공간은 정말 말도 안되게 학습 오래 걸리기 때문에 5*5로 해봅시다.
Board Class
class Board:
    def __init__(self, width: int, height: int, block_size: int):
        pygame.init()
        pygame.font.init()

        self.width = width
        self.height = height

        self.font = pygame.font.SysFont('Arial', 30)

        self.board = [[Grid(x, y) for x in range(width)] for y in range(height)]
        self.block_size = block_size
        self.padding = 20

        self.background = (255, 255, 255)

        # pygame section
        self.screen = pygame.display.set_mode(
            (block_size * width + self.padding * 2, block_size * height + self.padding * 2))

        self.update()
        return

    def set_grid(self, new: Grid):
        self.board[new.y][new.x] = new
        return

    def update(self):
        self.screen.fill(self.background)

        for y in range(self.height):
            for x in range(self.width):
                self.grid_update(x, y)

        self.draw_grid_lines()

        pygame.display.flip()
        # pygame.display.update()

        return

    def draw_grid_lines(self):
        line_color = (0, 0, 0)
        line_width = 1

        for x in range(self.width + 1):
            start_pos = (self.padding + x * self.block_size, self.padding)
            end_pos = (self.padding + x * self.block_size,
                       self.padding + self.height * self.block_size)
            pygame.draw.line(self.screen, line_color, start_pos, end_pos, line_width)

        for y in range(self.height + 1):
            start_pos = (self.padding, self.padding + y * self.block_size)
            end_pos = (self.padding + self.width * self.block_size,
                       self.padding + y * self.block_size)
            pygame.draw.line(self.screen, line_color, start_pos, end_pos, line_width)
        return

    def grid_update(self, x: int, y: int):
        block = self.board[y][x]
        if block is None: return
        # print(x, y, block)
        rect = pygame.draw.rect(self.screen, block.color,
                                (
                                    self.padding + x * self.block_size, self.padding + y * self.block_size,
                                    self.block_size,
                                    self.block_size))

        text = self.font.render(block.text, True, (255, 255, 255))
        text_rect = text.get_rect()
        text_rect.center = (self.padding + x * self.block_size + self.block_size // 2,
                            self.padding + y * self.block_size + self.block_size // 2)
        self.screen.blit(text, text_rect)

        return

    def valid_position(self, y, x):
        if 0 <= y < self.height and 0 <= x < self.width:
            return self.board[y][x].grid_type != "wall"
        return False

    def __copy__(self):
        result = Board(self.width, self.height, self.block_size)

        for y in range(self.height):
            for x in range(self.width):
                result.set_grid(self.board[y][x])
        return result
일단 위와 같이 클래스 Board를 만들고, 이걸 통해서 시각화를 진행해 봅시다.
간단한 maze를 만들어 보았습니다. 아래의 코드를 실행시키면!
main 초기 코드
from CompyGrid import *
from Algorithm import *
import pygame


def initialize() -> Board:
    x = 5
    y = 5

    board = Board(x, y, 150)

    maze = [
        [1, 1, 1, 0, 0],
        [1, 0, 1, 1, 0],
        [1, 1, 0, 1, 1],
        [1, 0, 0, 1, 0],
        [1, 1, 1, 1, 1]
    ]

    for i in range(y):
        for j in range(x):
            state = maze[i][j]

            block = Grid(j, i, "empty" if state else "wall", str(state), (0, 170, 200) if state else (175, 0, 0))
            board.set_grid(block)


    return board


board = initialize()
board.update()

while True:
    for event in pygame.event.get():
        if event.type == pygame.QUIT:
            break;
maze = [
[1, 1, 1, 0, 0],
[1, 0, 1, 1, 0],
[1, 1, 0, 1, 1],
[1, 0, 0, 1, 0],
[1, 1, 1, 1, 1]
]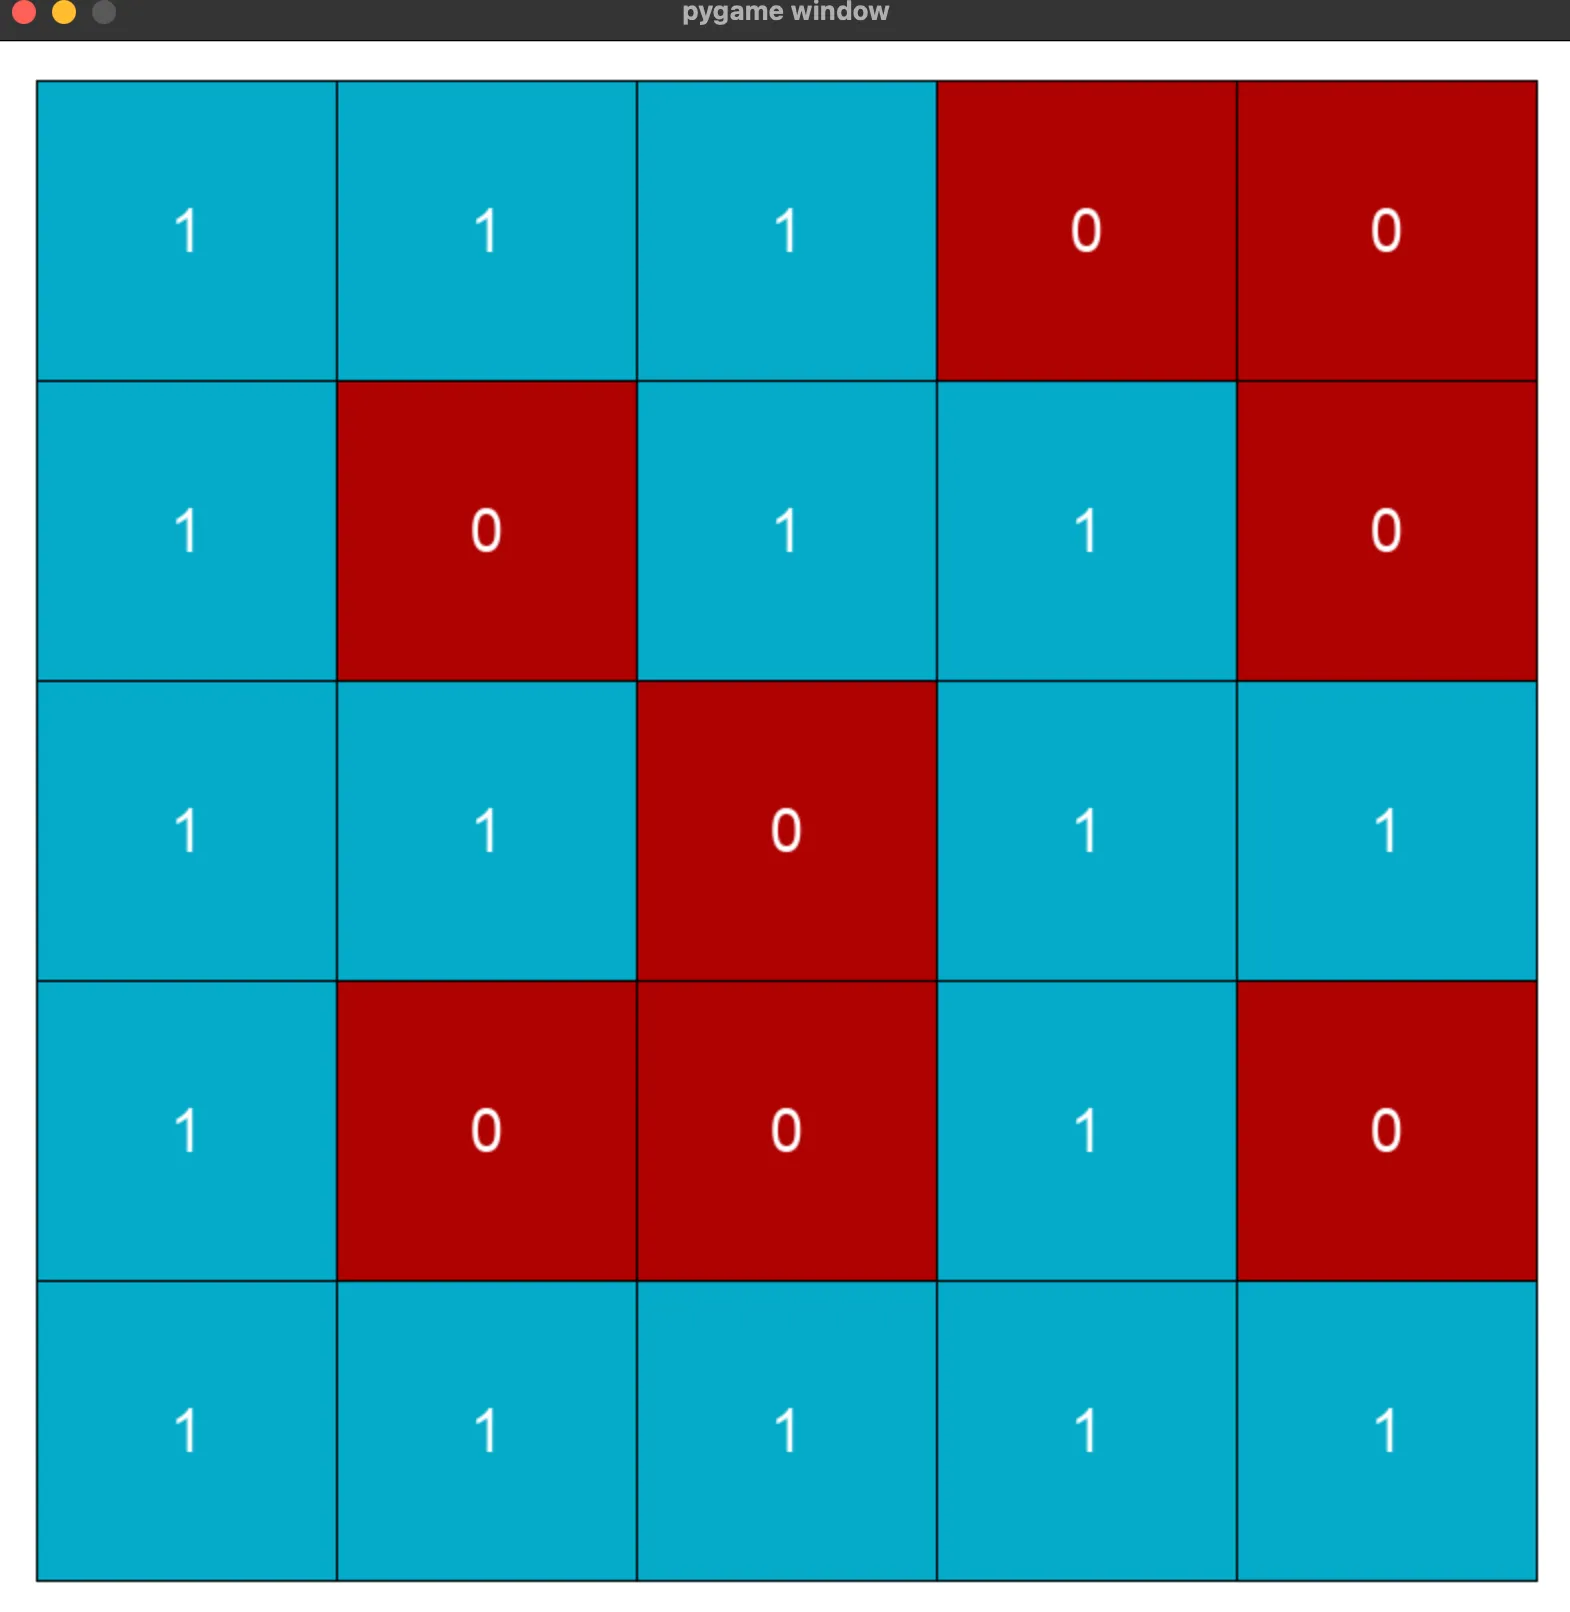 처럼 나오게 됩니다.
일단 Q-learning으로 진짜되나? 얼마나 잘 되는 것일까?를 보기 위해서 bruteforce 즉 랜덤으로 탈출하는 알고리즘을 작성해서 비교해봅시다!
Bruteforce 알고리즘
import pygame
import random
import imageio
from CompyGrid.Grid import Grid
class Bruteforce:
def __init__(self, output_path="bruteforce_path"):
self.output_path= output_path
pass
def bruteforce_escape(self, board, max_steps=100000, record=True):
agent_pos = [0, 0]
goal_pos = [board.width - 1, board.height - 1]
steps = 0
path = [agent_pos.copy()]
clock = pygame.time.Clock()
while agent_pos != goal_pos and steps < max_steps:
action = random.randint(0, 3) # 0=right, 1=left, 2=down, 3=up
x, y = agent_pos[0], agent_pos[1]
new_x, new_y = x, y
if action == 0: # right
new_x = x + 1
elif action == 1: # left
new_x = x - 1
elif action == 2: # down
new_y = y + 1
elif action == 3: # up
new_y = y - 1
if board.valid_position(new_y, new_x):
agent_pos = [new_x, new_y]
path.append(agent_pos.copy())
steps += 1
if steps % 10 == 0:
board.screen.fill(board.background)
for grid_y in range(board.height):
for grid_x in range(board.width):
board.grid_update(grid_x, grid_y)
pre = board.board[agent_pos[1]][agent_pos[0]]
agent_grid = Grid(agent_pos[0], agent_pos[1],
text="B", color=(255, 165, 0))
board.set_grid(agent_grid)
board.grid_update(agent_pos[0], agent_pos[1])
goal_grid = Grid(goal_pos[0], goal_pos[1],
grid_type="goal",
text="G", color=(0, 255, 0))
board.set_grid(goal_grid)
board.grid_update(goal_pos[0], goal_pos[1])
font = pygame.font.SysFont('Arial', 20)
text = font.render(f"Brute-force | Steps: {steps}", True, (255, 255, 255))
board.screen.blit(text, (10, 10))
pygame.display.flip()
clock.tick(60)
board.set_grid(pre)
for event in pygame.event.get():
if event.type == pygame.QUIT:
return steps, path
print(agent_pos, goal_pos)
if agent_pos == goal_pos:
print(f"Bruteforce: 총 {steps} 스텝")
else:
print(f"Bruteforce 실패")
if record and agent_pos == goal_pos:
self.save_path_as_gif(board, path, goal_pos, f"{self.output_path}.gif", fps=30)
return steps, path
def save_path_as_gif(self, board, path, goal_pos, filename, fps=10):
frames = []
sample_rate = max(1, len(path) // 1000)
sampled_path = path[::sample_rate]
print(f"총 {len(path)} 스텝 중 {len(sampled_path)} 프레임 녹화...")
for i, pos in enumerate(sampled_path):
board.screen.fill(board.background)
for y in range(board.height):
for x in range(board.width):
board.grid_update(x, y)
for j in range(max(0, i - 50), i):
if j < len(sampled_path):
trail_pos = sampled_path[j]
trail_grid = Grid(trail_pos[0], trail_pos[1],
grid_type="trail",
text="", color=(200, 200, 100))
board.set_grid(trail_grid)
board.grid_update(trail_pos[0], trail_pos[1])
agent_grid = Grid(pos[0], pos[1],
grid_type="agent",
text="B", color=(255, 165, 0))
board.set_grid(agent_grid)
board.grid_update(pos[0], pos[1])
goal_grid = Grid(goal_pos[0], goal_pos[1],
grid_type="goal",
text="G", color=(0, 255, 0))
board.set_grid(goal_grid)
board.grid_update(goal_pos[0], goal_pos[1])
font = pygame.font.SysFont('Arial', 30)
original_step = i * sample_rate
text = font.render(f"Brute-force | Step: {original_step}/{len(path)}",
True, (255, 255, 255))
board.screen.blit(text, (10, 10))
pygame.display.flip()
frame = pygame.surfarray.array3d(board.screen)
frame = frame.transpose([1, 0, 2])
frames.append(frame)
duration = 1000 / fps
imageio.mimsave(filename, frames, duration=duration, loop=0)
이렇게 작성하여서, gif로 어떻게 되었는지 결과도 볼 수 있게 만들어봤습니다.
이제 Q-learning을 작성해봅시다!
import copy
import pygame
from CompyGrid.Grid import Grid
import os
from PIL import Image
import imageio
import numpy as np
class QLearning:
def __init__(self, n_states, n_actions, learning_rate=0.1, discount_factor=0.9, epsilon=0.2):
"""
n_states: 상태의 개수
n_actions: 행동의 개수
learning_rate: 학습률 (alpha)
discount_factor: 할인율 (gamma)
epsilon: 탐험 확률 (epsilon-greedy)
"""
self.n_states = n_states
self.n_actions = n_actions
self.lr = learning_rate
self.gamma = discount_factor
self.epsilon = epsilon
self.q_table = np.zeros((n_states, n_actions)) # (상태 * 행동)
self.directions = ["right", "left", "down", "up"]
return
def get_action(self, state): # epsilon greedy로 탐험과 활용
if np.random.random() < self.epsilon:
return np.random.randint(0, self.n_actions)
else:
return np.argmax(self.q_table[state, :])
def update_q_table(self, state, action, reward, next_state):
"""
Q-table (Q-Learning의 핵심입니다)
------------
state: 현재 상태
action: 수행한 행동
reward: 받은 보상
next_state: 다음 상태
"""
# Q-Learning 업데이트 공식
# Q(s,a) = Q(s,a) + α[r + γ*max(Q(s',a')) - Q(s,a)]
current_q = self.q_table[state, action]
max_next_q = np.max(self.q_table[next_state, :])
new_q = current_q + self.lr * (reward + self.gamma * max_next_q - current_q)
self.q_table[state, action] = new_q
def theta_to_pi(self, theta): # 현재 행동 확률 분포 반환
# Softmax 함수 적용
exp_theta = np.exp(theta)
pi = exp_theta / np.sum(exp_theta, axis=1, keepdims=True)
return pi
def get_policy(self): # 행동 반환해주는거 argmax Q(s, a)
return np.argmax(self.q_table, axis=1)
def train(self, board, episodes=1000, render_interval=100):
for episode in range(episodes):
agent_pos = [0, 0]
goal_pos = [board.width - 1, board.height - 1]
state = agent_pos[1] * board.width + agent_pos[0]
done = False
total_reward = 0
steps = 0
max_steps = board.width * board.height * 4
path = [agent_pos.copy()] if render_interval > 0 and episode % render_interval == 0 else None
while not done and steps < max_steps:
action = self.get_action(state)
x, y = agent_pos[0], agent_pos[1]
new_x, new_y = x, y
if action == 0: # right
new_x = x + 1
elif action == 1: # left
new_x = x - 1
elif action == 2: # down
new_y = y + 1
elif action == 3: # up
new_y = y - 1
if board.valid_position(new_y, new_x):
agent_pos = [new_x, new_y]
reward = 0
else:
reward = 0
next_state = agent_pos[1] * board.width + agent_pos[0]
if agent_pos == goal_pos:
reward = 10
done = True
self.update_q_table(state, action, reward, next_state)
state = next_state
total_reward += reward
steps += 1
if path is not None:
path.append(agent_pos.copy())
if path is not None:
self._render_path(board, path, goal_pos)
if (episode + 1) % 100 == 0:
print(f"Episode {episode + 1}/{episodes}, "
f"Total Reward: {total_reward:.2f}, "
f"Steps: {steps}")
return self.q_table
def _render_path(self, board, path, goal_pos):
for i, pos in enumerate(path):
board.screen.fill(board.background)
for y in range(board.height):
for x in range(board.width):
board.grid_update(x, y)
for prev_pos in path[:i]:
trail_grid = Grid(prev_pos[0], prev_pos[1],
grid_type="trail",
text="", color=(150, 150, 255))
board.set_grid(trail_grid)
board.grid_update(prev_pos[0], prev_pos[1])
agent_grid = Grid(pos[0], pos[1],
grid_type="agent",
text="A", color=(255, 0, 0))
board.set_grid(agent_grid)
board.grid_update(pos[0], pos[1])
goal_grid = Grid(goal_pos[0], goal_pos[1],
grid_type="goal",
text="G", color=(0, 255, 0))
board.set_grid(goal_grid)
board.grid_update(goal_pos[0], goal_pos[1])
pygame.display.flip()
pygame.time.wait(100)
def record_episode(self, board, output_path="agent_path", format="gif", fps=10):
frames = []
agent_pos = [0, 0]
goal_pos = [board.width - 1, board.height - 1]
state = agent_pos[1] * board.width + agent_pos[0]
done = False
steps = 0
max_steps = board.width * board.height * 4
path = [agent_pos.copy()]
while not done and steps < max_steps:
action = int(self.get_policy()[state])
x, y = agent_pos[0], agent_pos[1]
new_x, new_y = x, y
if action == 0: # right
new_x = x + 1
elif action == 1: # left
new_x = x - 1
elif action == 2: # down
new_y = y + 1
elif action == 3: # up
new_y = y - 1
if board.valid_position(new_y, new_x):
agent_pos = [new_x, new_y]
path.append(agent_pos.copy())
next_state = agent_pos[1] * board.width + agent_pos[0]
done = (agent_pos == goal_pos)
state = next_state
steps += 1
for i, pos in enumerate(path):
board.screen.fill(board.background)
for y in range(board.height):
for x in range(board.width):
board.grid_update(x, y)
for prev_pos in path[:i]:
trail_grid = Grid(prev_pos[0], prev_pos[1],
grid_type="trail",
text="", color=(150, 150, 255))
board.set_grid(trail_grid)
board.grid_update(prev_pos[0], prev_pos[1])
agent_grid = Grid(pos[0], pos[1],
grid_type="agent",
text="A", color=(255, 0, 0))
board.set_grid(agent_grid)
board.grid_update(pos[0], pos[1])
goal_grid = Grid(goal_pos[0], goal_pos[1],
grid_type="goal",
text="G", color=(0, 255, 0))
board.set_grid(goal_grid)
board.grid_update(goal_pos[0], goal_pos[1])
pygame.display.flip()
frame = pygame.surfarray.array3d(board.screen)
frame = frame.transpose([1, 0, 2])
frames.append(frame)
if format == "gif":
self._save_as_gif(frames, f"{output_path}.gif", fps)
return len(path)
def _save_as_gif(self, frames, filepath, fps):
duration = 1000 / fps # ms
imageio.mimsave(filepath, frames, duration=duration, loop=0)
사실 블로그에 이론적 설명은 전 포스트에서 했었고, 여기서 또 설명하기 보다는 코드에 조금 설명을 적어 놓았습니다.
이 흐름대로 쭉 보시면 이해하기 편할 것이라 생각했구요. 시각화 코드는 그냥 무시하셔도 전혀 지장이 없습니다. 왜냐면.. 코드가 좋지 않아요 ㅠ 그냥 어떻게든 시각화하고, 결과 뽑으려고 짠 코드라 그렇게 좋은 코드는 아닌것 같습니다.
하튼 이렇게 완성된 코드를 가지고 이제 main에 가져와서 둘 다 결과를 뽑아봅시다.
from CompyGrid import *
from Algorithm import *
import pygame
def initialize() -> Board:
x = 5
y = 5
board = Board(x, y, 150)
maze = [
        [1, 1, 1, 0, 0],
        [1, 0, 1, 1, 0],
        [1, 1, 0, 1, 1],
        [1, 0, 0, 1, 0],
        [1, 1, 1, 1, 1]
    ]
for i in range(y):
for j in range(x):
state = maze[i][j]
block = Grid(j, i, "empty" if state else "wall", str(state), (0, 170, 200) if state else (175, 0, 0))
board.set_grid(block)
return board
board = initialize()
board.update()
bruteforce = Bruteforce()
bruteforce_steps, bruteforce_path = bruteforce.bruteforce_escape(
board, max_steps=100000, record=True
)
board = initialize()
board.update()
n_states = 5 * 5
n_actions = 4
q_learning = QLearning(n_states, n_actions,
learning_rate=0.1,
discount_factor=0.95,
epsilon=0.15)
q_learning.train(board, episodes=10000, render_interval=0)
q_learning.record_episode(board, "qlearning_path", format="gif", fps=5)
이렇게 실행을 시켜보면?!
어떤 결과가 나올까요?
먼저 브포의 결과를 살펴보겠습니다.
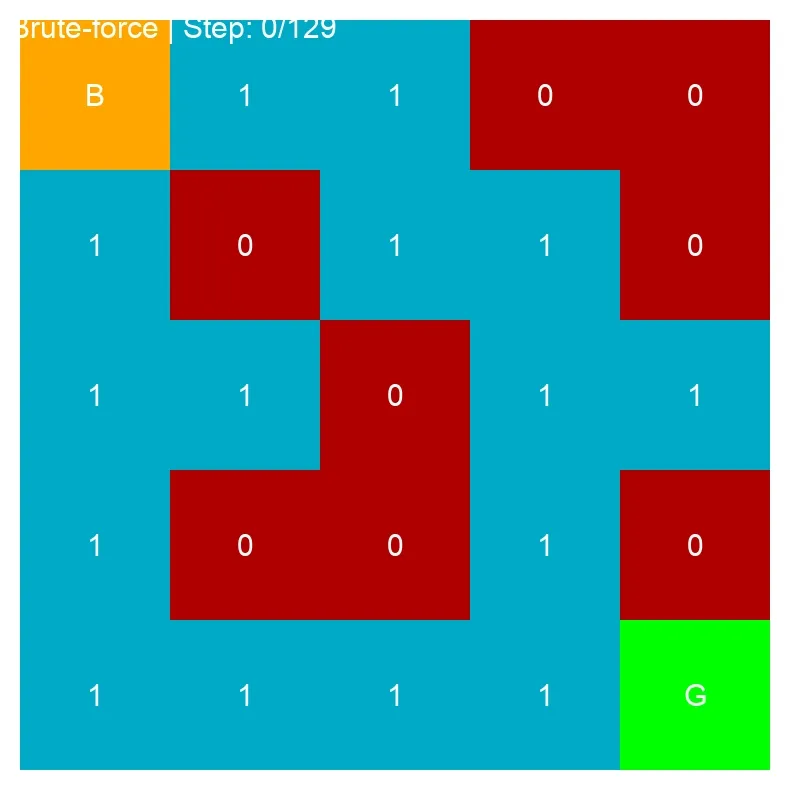
이렇게 총 129 step을 밟아서 도착점에 도달했습니다. 음.. 정말 비효율적으로 도착했구요.
이제는 Q-learning은 어떻게 했는지.. (학습은 코드와 같이 10000번 시켜서 다 보여주긴 힘들고, 마지막으로 학습된 상태에 어떻게 길을 찾았나만 보도록 하겠습니다.)
자 그럼 결과를 보도록 하겠습니다.
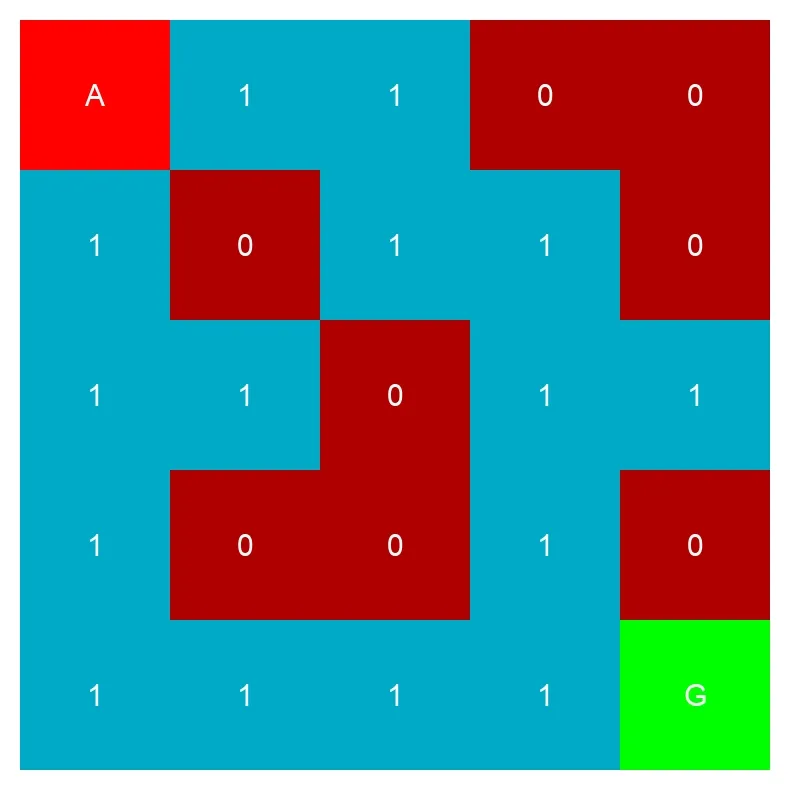
총 8 step만에 도착했습니다.
그래서 결과적으로 이런 결과가 나왔는데용?
| 알고리즘 | 소요 Step |
|---|---|
| Bruteforce | 129 |
| Q-Learning | 8 |
이렇게 Q-learning이 어떻게 동작하는지(코드로) 알아보았고요, 그 결과를 bruteforce와 비교해보았습니다.
하지만 저번 포스팅에서도 말했지만, 이 board의 크기가 조금만 커져도 적용이 힘들다는 큰 단점이 존재하구요..
현재 코드에서 되게 비효율적인 부분이 있을겁니다. 혼자 고쳐보셔도 되고, 아니면 아래 detail 열어서 확인해보시면 좋겠습니다.
비효율적인 부분
                if board.valid_position(new_y, new_x):
                    agent_pos = [new_x, new_y]
                    reward = 0
                else:
                    reward = 0

                next_state = agent_pos[1] * board.width + agent_pos[0]


                if agent_pos == goal_pos:
                    reward = 10
                    done = True
지금보면, 이동이 불가능한 곳에 갔을 때 -1을 주고, 이동가능하면 +1을 주고 도착하면 엄청 큰 보상을 주면 더욱 빠르게 학습하겠죠?
하지만 저는 그렇게 작성하지 않았습니다. 왜 그럴까요? Q-learning이 처음 도입되었을 때는 이론적으로 목표에 도달을 해야지, 그 목표에 대한 가치가 역으로 전파되면서 로 전파되면서 가치가 업데이트 됩니다. 그걸 정확히 구현하기 위해서 저렇게 했는데요. 저게 사실 조금만 생각해도 문제가 많아 보입니다. 애초에 목표에 도달을 못하면 Q table이 업데이트가 안돼요. 즉, 목표에 도달하지 못하면 Q-table에 의미있는 업데이트가 발생하지 않습니다. 또 이상한 뻘짓하다가 결국에는 목표에 도달했는데, Q-learning에서는 그러한 뻘짓도 좋은거로 착각하는 문제도 있습니다.
이런 문제들을 우리는
- 희소 보상 문제 (Sparse Reward Problem): 보상이 드물게 주어져 학습 신호가 부족한 문제
- 신용 할당 문제 (Credit Assignment Problem): 어떤 과거 행동이 현재 보상에 기여했는지 판단하기 어려운 문제
라고 합니다.
그래서 즉각적 보상을 주는 것으로 더 빨리 학습시킬 수 있는 방법이 있는 겁니당. 이게 현대에는 거의 당연시되게 적용되구요.